Obviously, website migration is not something you do on a daily basis unless you work in the field. And even though CMS data migration is not a rocket science, it requires certain knowledge and proper preparation. Abraham Lincoln once said, “Give me six hours to chop down a tree and I will spend the first four sharpening the axe”. Plan everything carefully – and your migration will be already 50% successful before you even start it.
To help you with planning and preparations and to make your website migration process less complicated, we provide you with this informative in-depth guide on WordPress CMS migration.
Pre-Migrations Steps to Take
WordPress Installation: Domain & Hosting
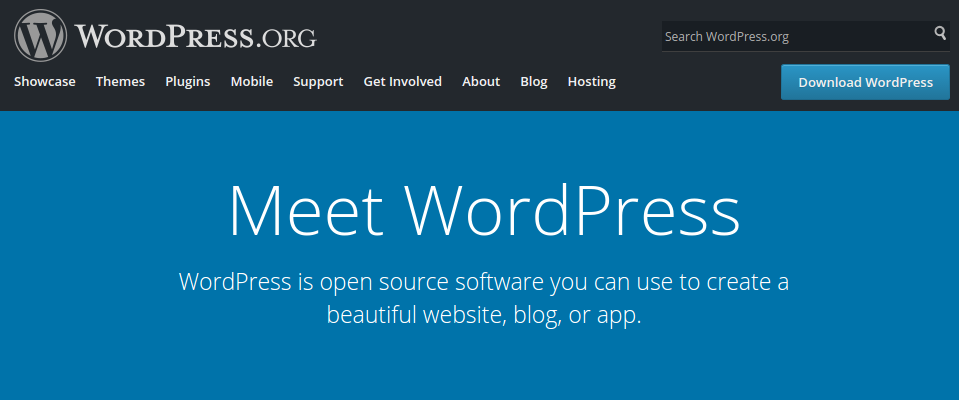
- You can install WordPress here: https://wordpress.org/ The file will be saved in a zip format and it will contain the latest WP version.
- Next step is to buy a domain name, an important aspect of your website because that’s how people are going to find your website on the Internet. There are many domain companies to choose from, but in general, it is possible to buy it for $15 per year on average.
- It is also important to buy hosting for your site, every site needs one. It stores all your website files and displays them to your site visitors. Hosting provider will also make sure that your website loads quickly and won’t go down for hours at a time Basically, a reliable hosting will cost you $6-7 per month. Choose the hosting company according to your requirements, possibilities, and budget.
Designing WordPress Site
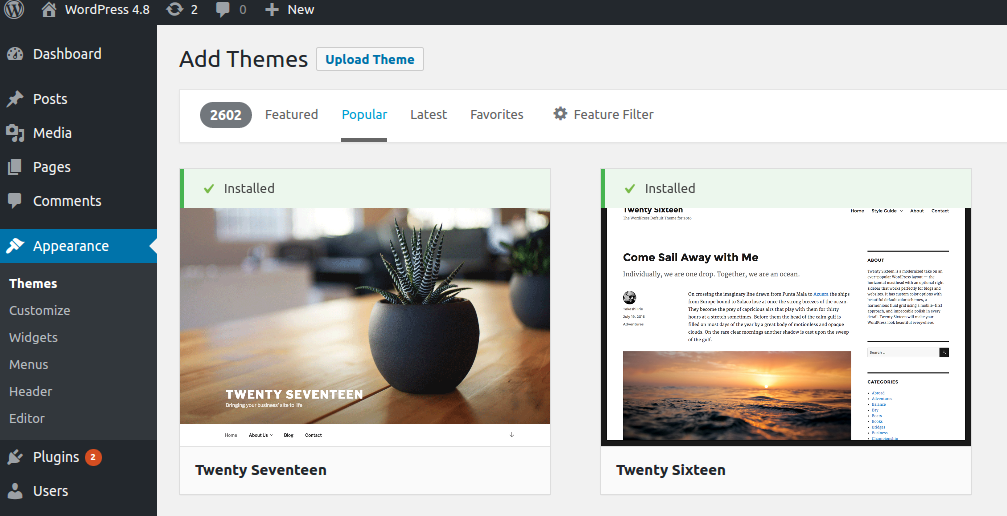
Once you have successfully installed your WordPress site, you will see a very basic design. However, it doesn’t have to be this way. There are tons of free and paid WordPress themes to choose from. You can also find the most suitable theme right within your dashboard, under Appearance >Theme > Upload theme.
Note: With aisite, automated website migration service, you will be able to migrate ONLY content! Not your theme, not your colors, not your layout.
Expanding WP Functionality
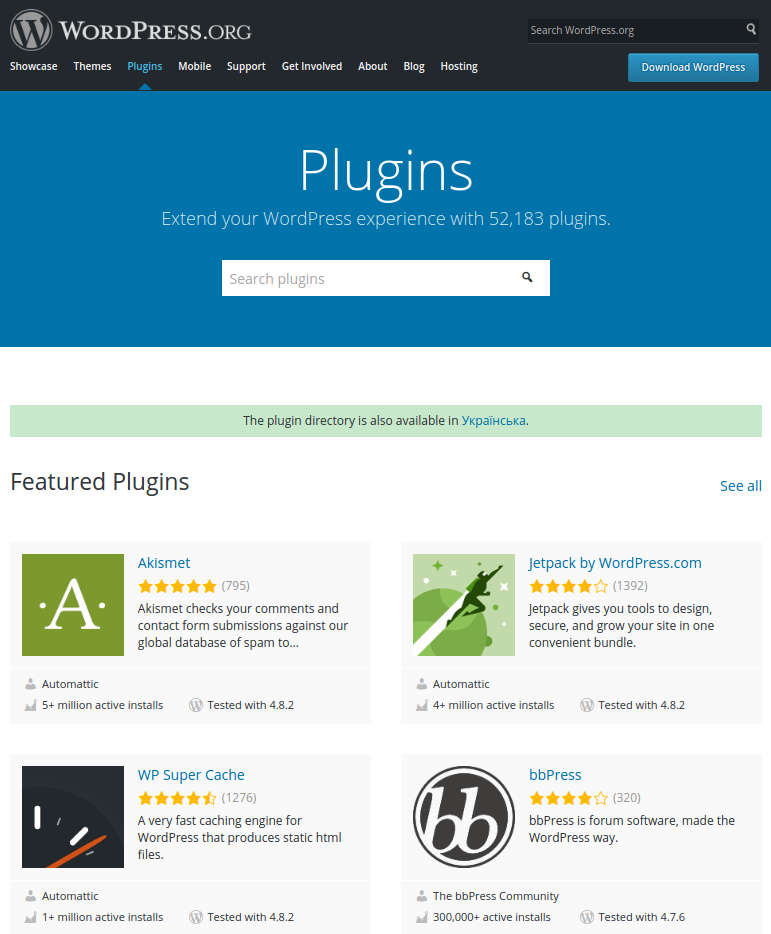
Plugins are used to expand the functionality of your WP site. There are more than 50 000 free WP plugins. With their help, you can add to your website such features as a gallery, contact form, etc. More professional plugins or ones with extra features are paid plugins which you can buy on different marketplaces.
Migration Process
aisite, an automated website migration service, is designed to make it simpler for website owners to move their sites from one CMS platform to another. Thus, the actual migration process (with the help of aisite) is rather simple. All you need to do is to follow this detailed instruction.
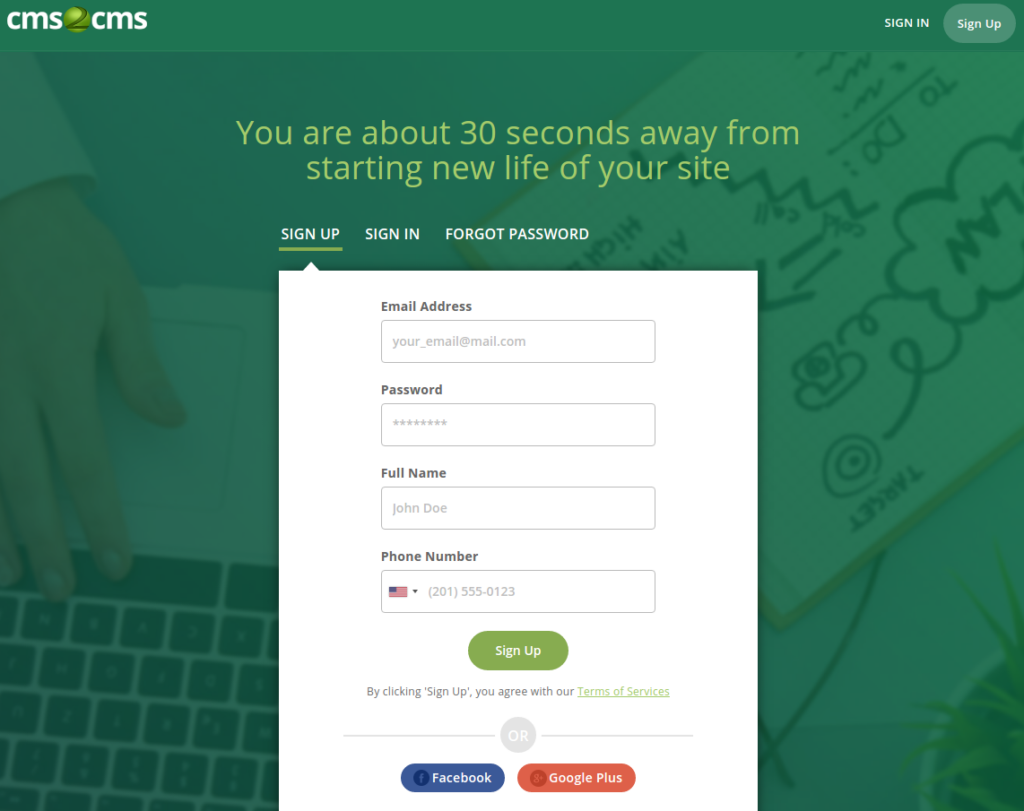
Register an Account
To get started with your migration setup, all you need to do is log in or create a new aisite account. Provide your name, email, phone number, choose a password – and you’re registered.
Specifying Your Existing Website Details
Selecting the Type of CMS Platform and Provide Its URL
Now, select your CMS platform type and specify the URL of your Existing website in the provided field in the migration wizard.
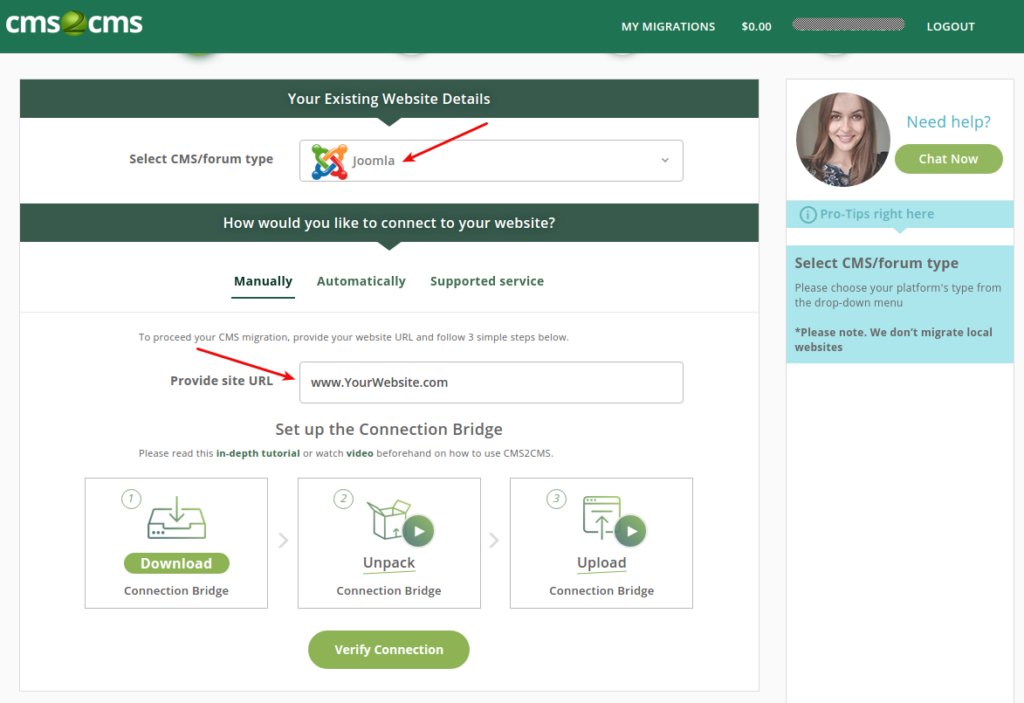
Connect to Your Existing Website
Now you are about to choose from three options. You can migrate your site to WordPress:
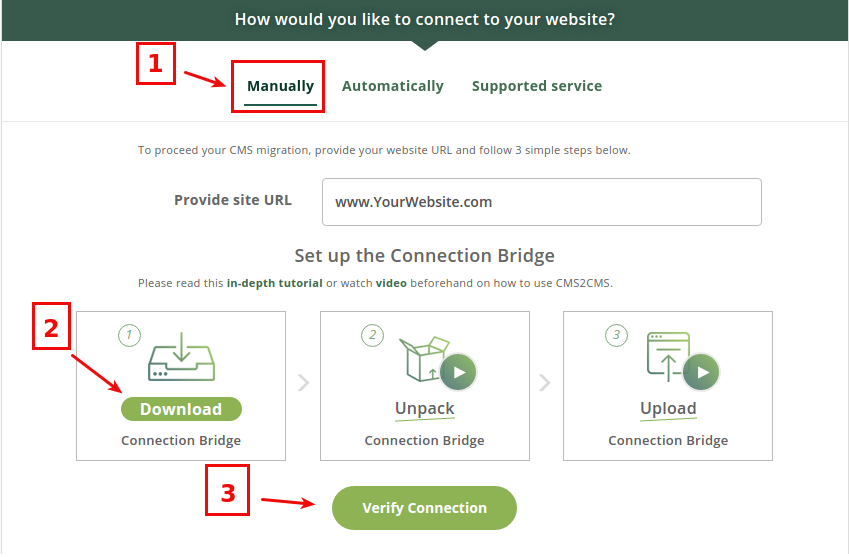
Manually
Manual migration requires the connection bridge installation. So, click the corresponding button and download the connection bridge file to your local computer. The bridge file will be saved as “aisite.zip”. You will need to :
- Extract the files to the corresponding folder on your computer.
- Connect to your current website via FTP. You can do it with any type of FTP client software, one of them is FileZilla. To connect to your website, you will need to specify your hostname, which you can find out from your hosting provider. Then provide your FTP access login and password.
- After that, right within your FTP client dashboard, open the root directory of your site. It is the top folder with the index.php file. Then, copy the “aisite” folder that you’ve extracted from your bridge file previously and paste it to the root folder.
Now when the connection bridge is already installed on your Existing site, press “Verify Connection” button in the migration wizard.
Once the whole process of your website migration is complete, you can remove the connection bridge.
Note: There is NO NEED to download the connection bridge for some CMSs (Wix, Squarespace, Weebly, Blogger, Jimdo, Umbraco, DNN, etc).
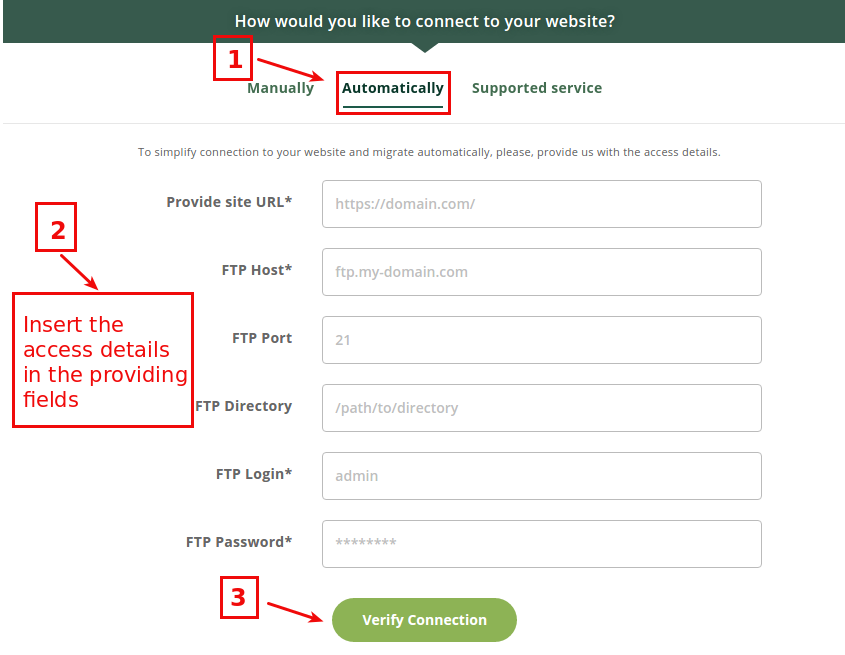
Automatically
It is possible to install the connection bridge without manually downloading and uploading it to the root directory of your site. Choose the automatic migration and provide your FTP access data – host, port, login, and password. You can ask your hosting provider for all the necessary FTP data.
Now when you have entered the valid FTP details into corresponding fields, press “Verify Connection” button in the migration wizard.
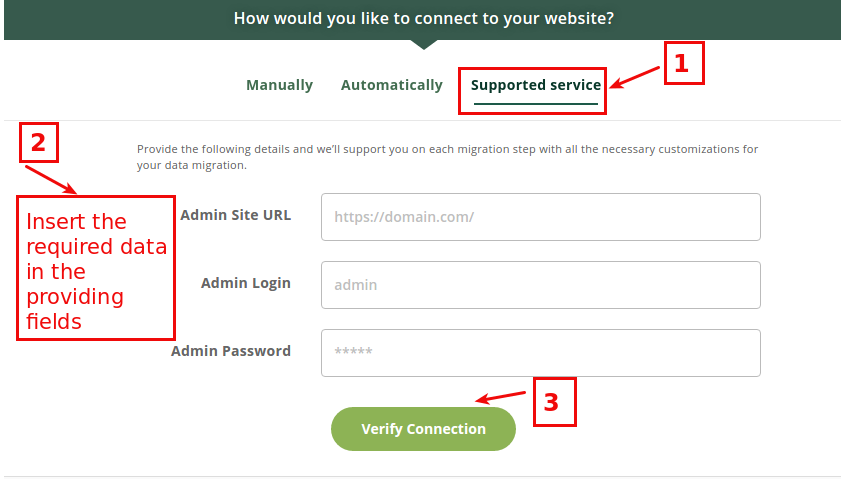
Supported Service
In case you need custom migration or you have some specific requirements, you can easily order a Supported Service Package right in the migration wizard. Provide the login and password to the admin panel of your Existing website and press “Verify Connection” button.
Specifying Your New Website Details
Selecting the Type and Providing the URL of CMS Platform and Provide Its URL
Now when you have verified the connection to your Existing website, select your New CMS platform type and specify its URL in the provided field in the migration wizard.
Connect to Your New Website
You can migrate your site to WordPress:
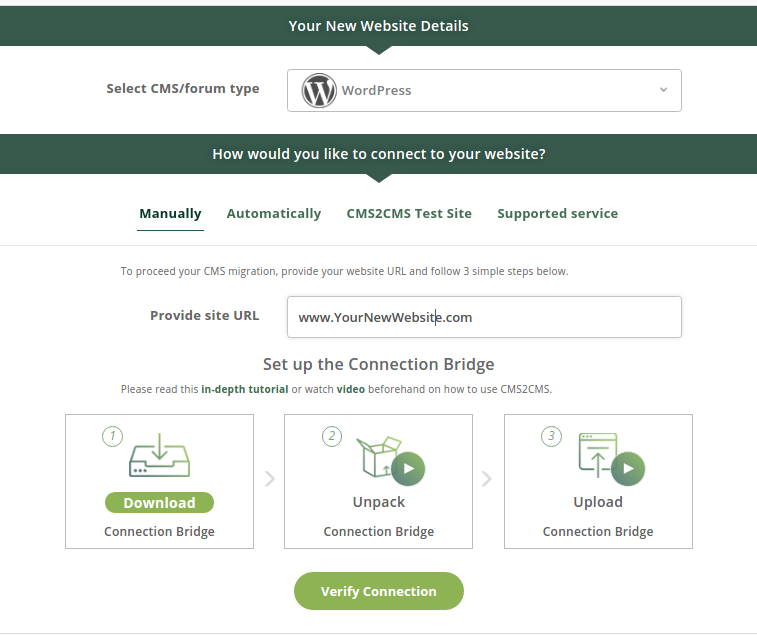
Manually
aisite offers you the opportunity to choose between the installation of the Connector Plugin or the Connection Bridge. Due to this, there are two paths you can go by, select the one you are more comfortable with.
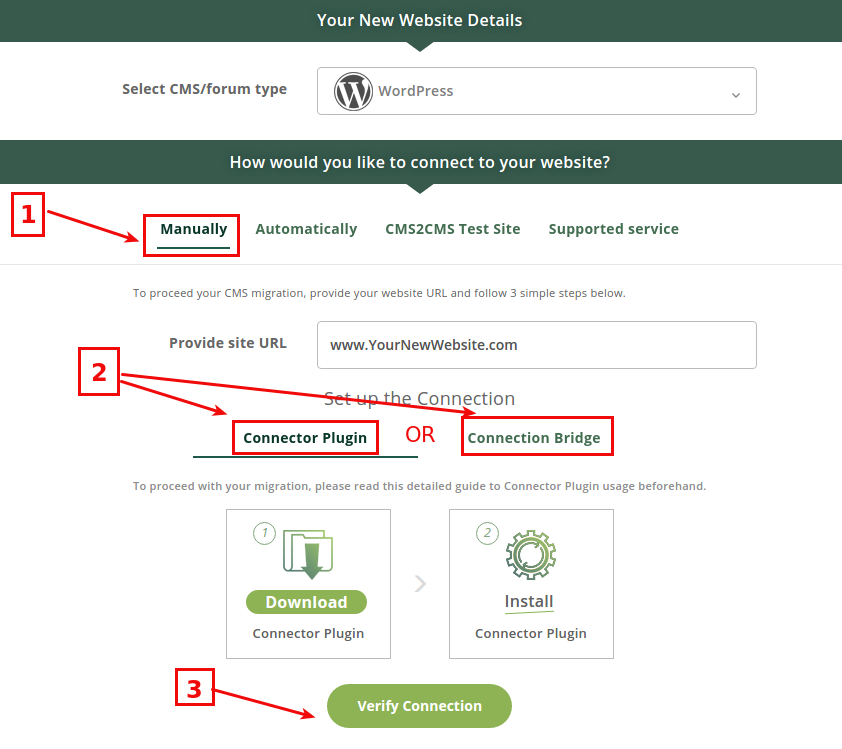
Connector Plugin
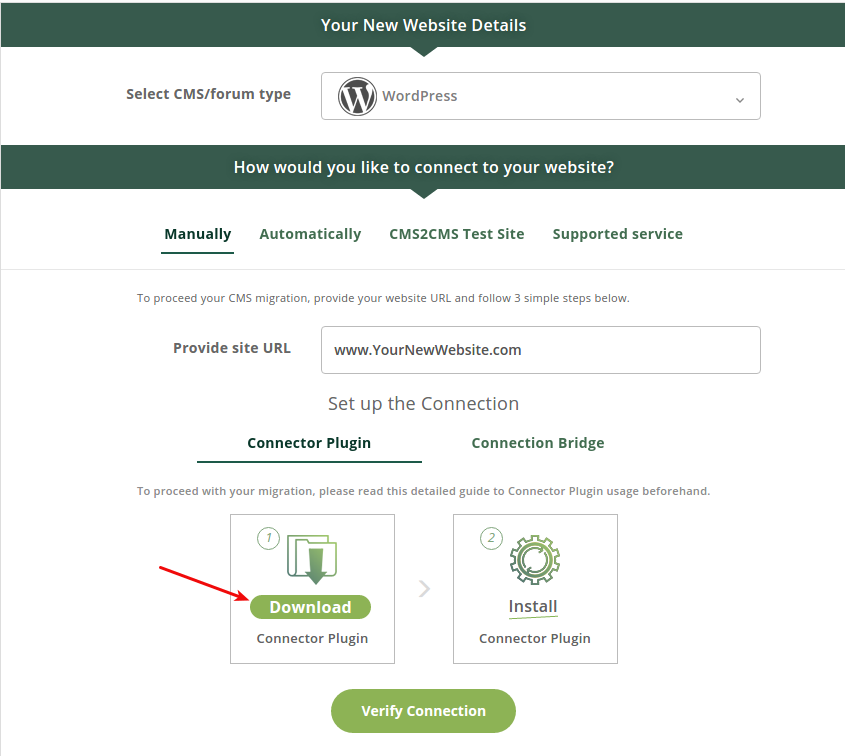
By clicking the “Download Connector Plugin” button, you will be redirected to the WordPress Plugin Repository, where you will have to download the connector plugin to your local computer. It will be saved as “aisite-connector.zip”.
Upload it to your WordPress site. Then go to Plugins on your Admin dashboard and activate the aisite Connector Plugin.
Click on the plugin and log into aisite. Now you can proceed with your migration.
Video Tutorial
Connection Bridge
Choosing this way of migration means the connection bridge installation. Thus, download the connection bridge file to your local computer. The bridge file will be saved as “aisite.zip”. Take the following steps:
- Extract the files to the corresponding folder on your computer.
- Connect to your New WordPress website via FTP. You can do it with any type of FTP client software, one of them is FileZilla. To connect to your website, you will need to specify your hostname, which you can find out from your hosting provider. Then provide your FTP access login and password.
- After that, right within your FTP client dashboard, open the root directory of your New WP site. It is the top folder with the index.php file. Then, copy the “aisite” folder that you’ve extracted from your bridge file previously and paste it to the root folder.

Now when the connection bridge is already installed on your New WordPress website, press “Verify Connection” button in the migration wizard.
Once the whole process of your website migration is complete, you can remove the connection bridge.
Automatically
It is possible to install the connection bridge without manually downloading and uploading it to the root directory of your site. Choose the automatic migration and provide your FTP access data – host, port, login and password. You can ask your hosting provider for all the necessary FTP data.
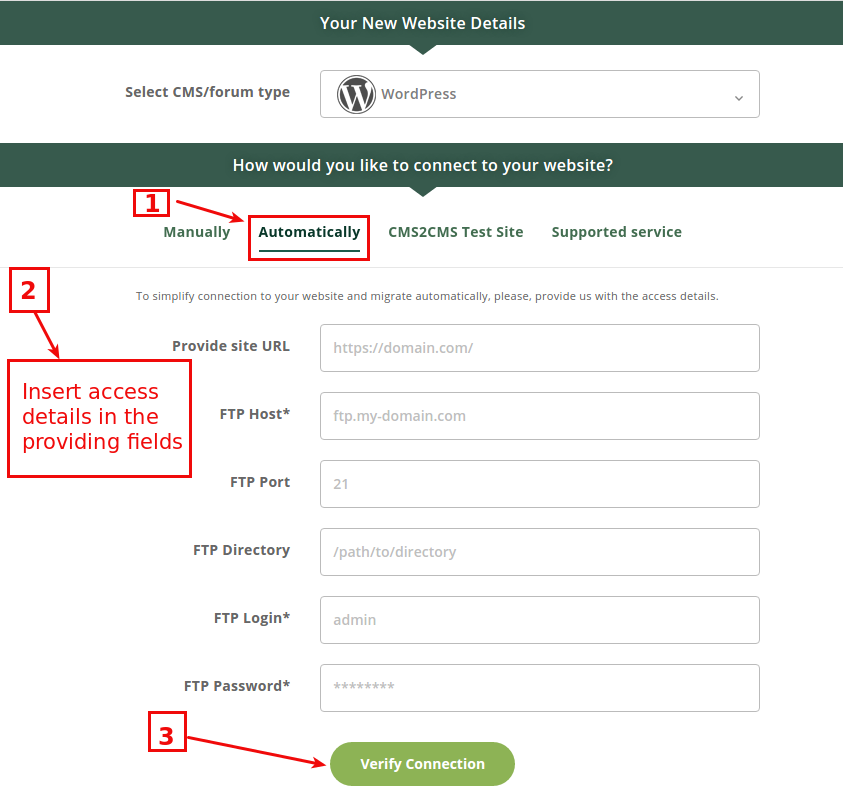
Now when you have entered the valid FTP details into corresponding fields, press “Verify Connection” button in the migration wizard.
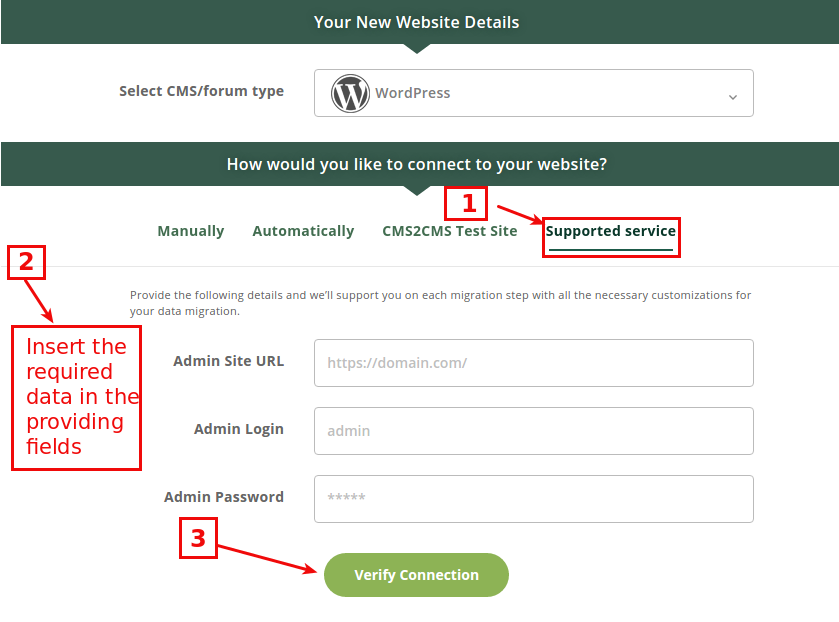
Supported Service
In case you need custom migration or you have some specific requirements, you can easily order a Supported Service Package right in the migration wizard. Provide the login and password to the admin panel of your Existing website and press “Verify Connection” button.
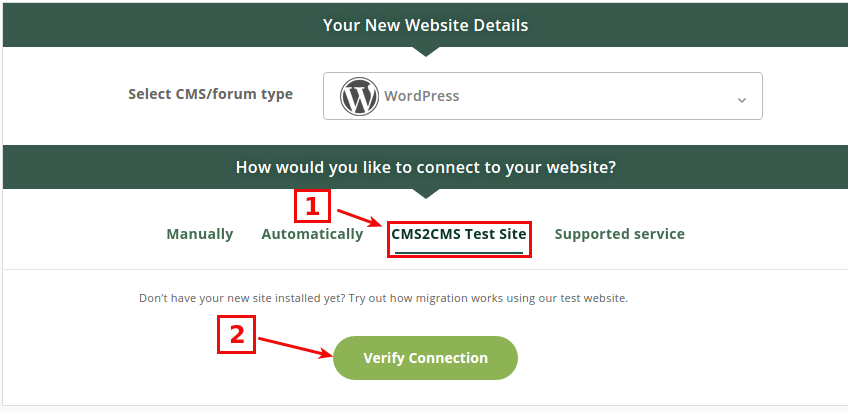
aisite Test Site
Even if you don’t have your New site installed and live, you can still try how easy it is to import your data using aisite test website. After the migration is performed, you can get your content by downloading it as a dump file.
Pay attention that if you migrate content from your Existing website to our Preview Website, the migrated data will be stored on our Preview test website’s server for 7 days.
Note that in case you perform Full migration to our Preview test website, you will be charged $5 in addition to the complete price of your migration.
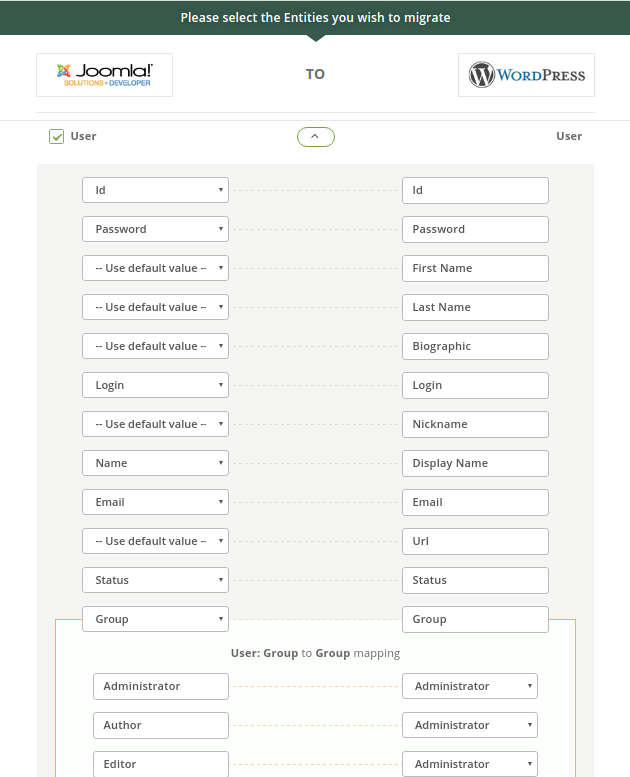
Deciding on Entities that should Be Migrated
The connection between your sites is verified. Now it’s time to select what data you are up to transfer to the New WordPress website. aisite service offers you the possibility of mapping content. When migrating from any CMS platform to WordPress you may specify where you wish your content be relocated to.
Selecting Additional Options
aisite enables you to choose the additional options if needed. This feature allows you to increase the benefit of your migration process. There are a few options you can choose from:
By choosing this option, your Existing website’s SEO rankings will be preserved. Meta keywords, meta title, and meta-description will be migrated from your Existing CMS to the New WordPress website.
Note: For WordPress migration install the Yoast SEO Plugin to ensure the successful metadata migration.
This option allows you to migrate images and attachments included in the content body of your Existing website to the content body of your WP site.
Automated 301 Redirects option preserves and transfers URLs and SEO rankings from your Existing website to the New WordPress site.
Note: There is the need to install and activate the “Redirection” plugin or “Simple 301 Redirect” plugins to your WordPress website beforehand.
Demo Migration
Now you are able to see how the aisite service works by running Free Demo Migration. You’ll be able to track the migration process right in your browser window and check out the results when Demo Migration complete!
But if you’d like to migrate all of your content right away, you may skip this step and launch the complete migration.
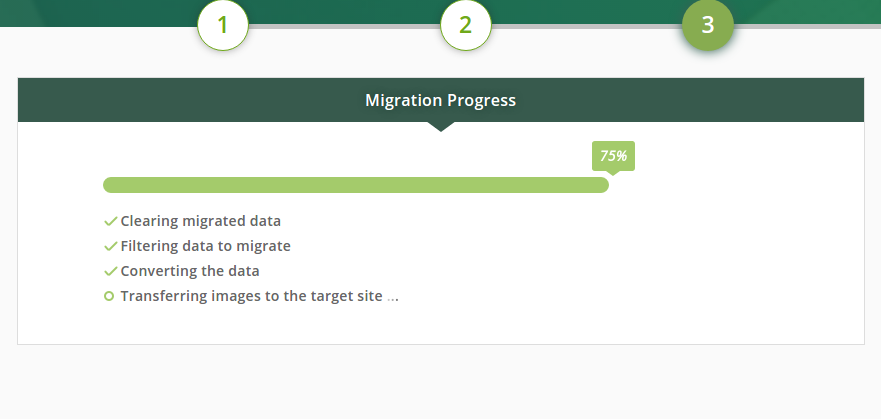
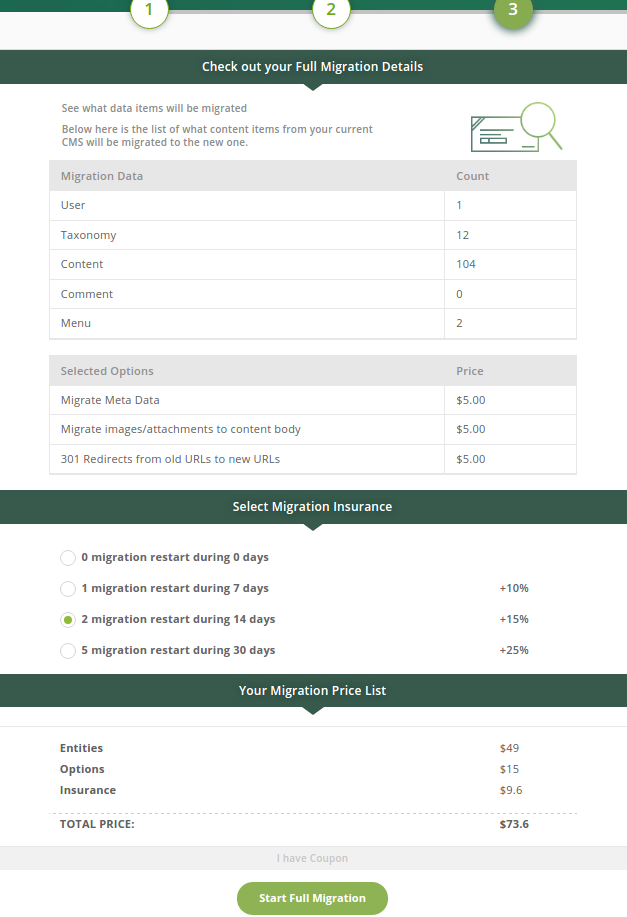
Launching Complete Migration
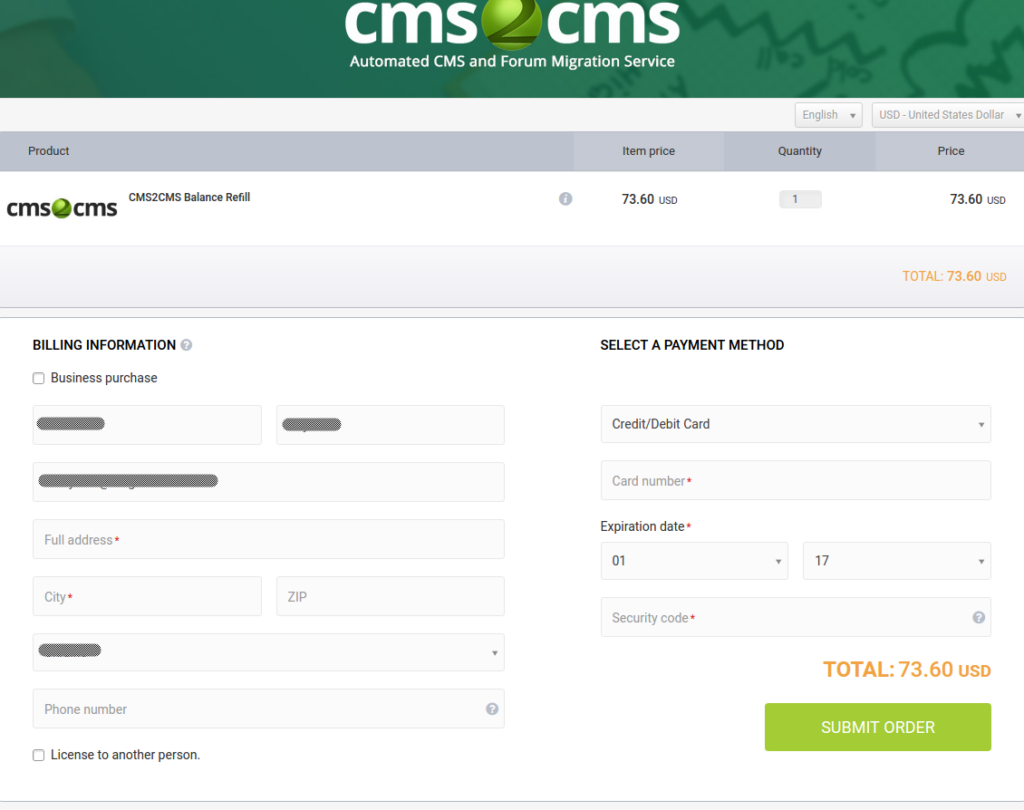
Your final step is to start your Complete Migration. If there are not enough funds on your account, you’ll be asked to credit it. Also, if you’ve got a discount coupon code, press the corresponding button.
To perform your WordPress migration:
-
Select the additional options needed
- Migrate Meta Data
- Migrate Images and Attachments to Content Body
- 301 Redirects from Old URLs to New URLs
-
Choose the migration insurance
aisite service provides you with a possibility to restart the same migration process. You can resume your CMS migration up to 5 times in just a few mouse clicks. All you have to do is to choose one of the Migration Insurance Plans on migration Wizard. In this manner, you will save your time and money investments, and you will stay calm despite the unpredictable circumstances.
-
Check how much it will cost
The prices for migration are flexible. The total migration cost depends on the quantity of content pages and entities for migration. You can calculate the exact price of your migration previously using Migration Estimator.
-
Press “Start Full Migration” button
When the transfer is complete, you will receive an email notification and be able to check out the new look of your New WordPress website.
Two Ways to Add Funds to Your Account
- You can add funds to your account within your dashboard, after you’ve Signed In/Up, click on the “Add Funds” button. Then enter the amount of money you want to add to your account. When ready, you’ll be redirected to aisite Secure Checkout to proceed with the payment process. There you’ll be required to fill in “Billing Information” and “Select a Payment Method” (like adding funds with a credit/debit card or PayPal or any other way) fields.
- The second way to add funds to your account is the following. Right after your Demo is completed, click on a “Start Full Migration” button and you’ll be redirected directly to aisite Secure Checkout where you will need to provide your “Billing Information” and “Select a Payment Method”.
Common Errors during the Website Migration
- 403 Forbidden error indicates that access to some files or folders is limited. Here are some solutions which you can try to resolve the issue.
- 413 kind of error means that the request is too large for your particular server. To get around the problem, try these solutions.
- 500 Server Error means that the permissions for bridge folder are incorrect. Here you can find possible solutions to this problem.
Steps After the Website Migration
Preview and Test Migration Results
The very first action you should do after completing the website migration is to check the results. Try to look at your migrated website in the same way the users will look at it. Find out if everything works well. Check whether all the migration data is accurate and in the appropriate format. In addition to the simple summary verification and record counts, it is advisable to compare the content using sampling and ensure data integrity.
Make Sure Your Site is Secure
It is necessary to invest some time to strengthen the protection of your Web home to defend it from possible future hacker attack. Applying the basic security tips is not a rocket science. No doubt you know some them – secure login credentials, installing security plugin and backup, backup, backup. More essential tips are offered in this post on WordPress security.
Performing the Data and System Optimization
Website migration process is a complicated task and despite all your preparations, there surely will be a few things you will have to adjust after the data transfer. Basically, it depends on the complexity of the project and the migration type.
Displaying the Menu
When migrating menus to WordPress CMS, by default they are not displayed on your public site. In order to make the menu show up, you need to take some steps in your admin panel.
Changing the Permalink Structure
By default, WordPress sets your article URLs to look something like http://yourdomain.com/?p=345. Since there are any readable words in the URL – it is poor for your website SEO. You can change your URL structure to look more like http://yourdomain.com/the-very-first-steps-after-migration-to-wordpress going to Settings ->Permalinks. Now make sure the button beside Custom Structure is checked and enter “Post name” in the field. Once you’ve selected one, click save.
Installing the Google XML Sitemap
You might want your WordPress website to be found by Google bots. You may make use of Google XML Sitemaps plugin – it creates an XML Sitemap of your site that is then submitted to the major search engines (Google, Yahoo,etc.) allowing them to index your site easily. Besides, you may go to Google Webmaster Central and log in with your Google Account. Once you’ve done the instructions there – click the “Add Sitemap” link from the first page and put in the URL to your sitemap, which will be http://www.yoursite.com/sitemap.xml.
Monitoring Your Site via Google Analytics
In case you wish to check out all your site’s statistics – Google Analytics is probably the best way to do that for free. It allows to track your online performance, monitor your traffic and analyze the behavior of your visitors.
Bottom Line
Hopefully, the aforementioned list of steps will allow you to make your WordPress website migration effortless and painless.
Note that aisite, an automated CMS migration service, provides you, our precious clients, with 24/7 high-quality support. Thus, in case you have any questions or suggestions, feel free to contact us.