If you’ve picked our service to settle the CMS migration issues and move your Existing website’s content to the New one (thanks for your choice, by the way :)), there is one big thing in the switch process, you should note. The core of data transfer from one platform to another lies in what is called ‘Connection Bridge’. In order to proceed migration successfully, you should know how to properly deal with its installation. It’s where we’re going to equip you with the CMS conversion details.
But first, what is the ‘Connection Bridge’, exactly?
aisite Connection Bridge is a special gateway that enables data interaction between the website you want to migrate from and the website to which you’re migrating. The Connection Bridge is crucial for the service to get all the necessary data for a successful site migration procedure.
Right, this is the core.
Apart from how to verify the connection between your New and Existing websites, we will also tell you about other small but important things to do for the smooth migration.
Tell me already how to switch websites with aisite
- Create a aisite account or Sign In via Social Media
- After you’ve logged in aisite account to perform the migration, choose the CMS type of the website you want to migrate from.
Attention! There are two possible migration scenarios depending on which CMS platforms you choose.
Scenario #1
If you’re migrating from non-Bridge type platforms, like WiX, Blogger, HTML static website, Tumblr, Perch, Weebly, Kentico, Google Sites, and Umbraco, then you don’t need to install the Connection Bridge to any of these platforms.
How to migrate from API?
- Select your non-Bridge type CMS platform your Existing website is built on.
- Provide your Existing website’s URL address.
- Click ‘Verify Connection’.
You’ll need the Connection Bridge later though to connect to your New website’s platform.
Scenario #2
If you’re migrating from or to such Bridge-type CMS and forum platforms like Joomla, Drupal, WordPress, phpBB, bbPress, vBulletin, SMF, Kunena, Joomla K2, please, look through the step-by-step tutorial below on how to deal with the Connection Bridge.
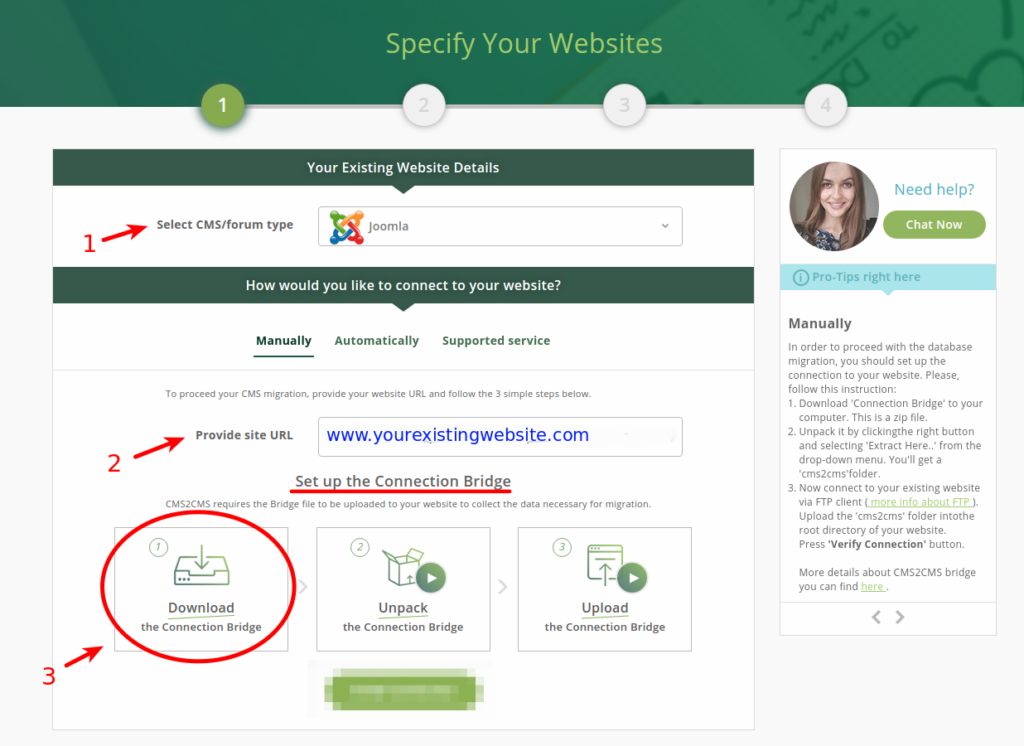
- Pick Bridge-type CMS platform your Existing website is built on.
- Enter your Existing website URL address.
- You’ll see 3 BIG BUTTONS: ‘Download’, ‘Unpack’ and ‘Upload’. The very first button is the exact one you should click to 🙂 After clicking to ‘Download’ button, you will see how a zip file named ‘aisite’ is saved to your computer.
Please note. We don’t migrate local websites. We don’t migrate the design!
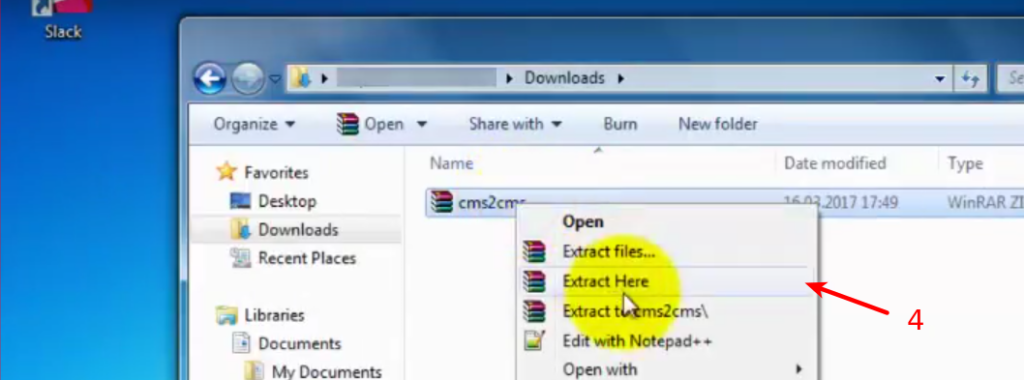
- When the download is finished, go to the place, where you’ve downloaded the zip file. Look inside of it and you’ll see a ‘aisite’ folder.
Extract the folder.
What next should I do with the extracted ‘aisite’ folder?
- Once the folder is extracted, connect to your Existing website via any type of FTP client software, e.g. WinSCP, FileFTP, FileZilla, CuteFTP, etc. by pointing out your host, username, and password (ask your hosting provider, if you don’t know these).
Note. Need FTP client? Here, download FileZilla.
- Within the FTP client, choose your Existing website’s directory.
- Copy the extracted ‘aisite’ folder and paste it into the root folder (top folder with the index.php file) of your Existing website.

- After this short procedure go back to the Migration Wizard and click ‘Verify Connection’.

- Apply the same specter of actions to connect to your New website and verify the data transfer process.
- Select the Bridge-type CMS platform (Joomla, TYPO3, or Drupal) your New website is built on.
- Provide your New website URL address.
- Set up the Connection Bridge. Download it in the form of a zip file.
- Extract the ‘aisite’ folder from the downloaded Bridge zip file.
- Upload the ‘aisite’ folder to the root folder of your New website via FTP client software.
- After all work is done, return to the Migration Wizard and click ‘Verify Connection’
In case you want to migrate to WordPress CMS:
- Select the new CMS platform
- Provide its URL address
- Enter your WordPress admin login and password, verify the connection

Can I choose what I want to migrate to my New website?
- Sure you can. After you’ve verified the connection between two of your websites, proceed with content items mapping. On Step 2 select what and how you want your Existing website’s data to be moved to the New website.
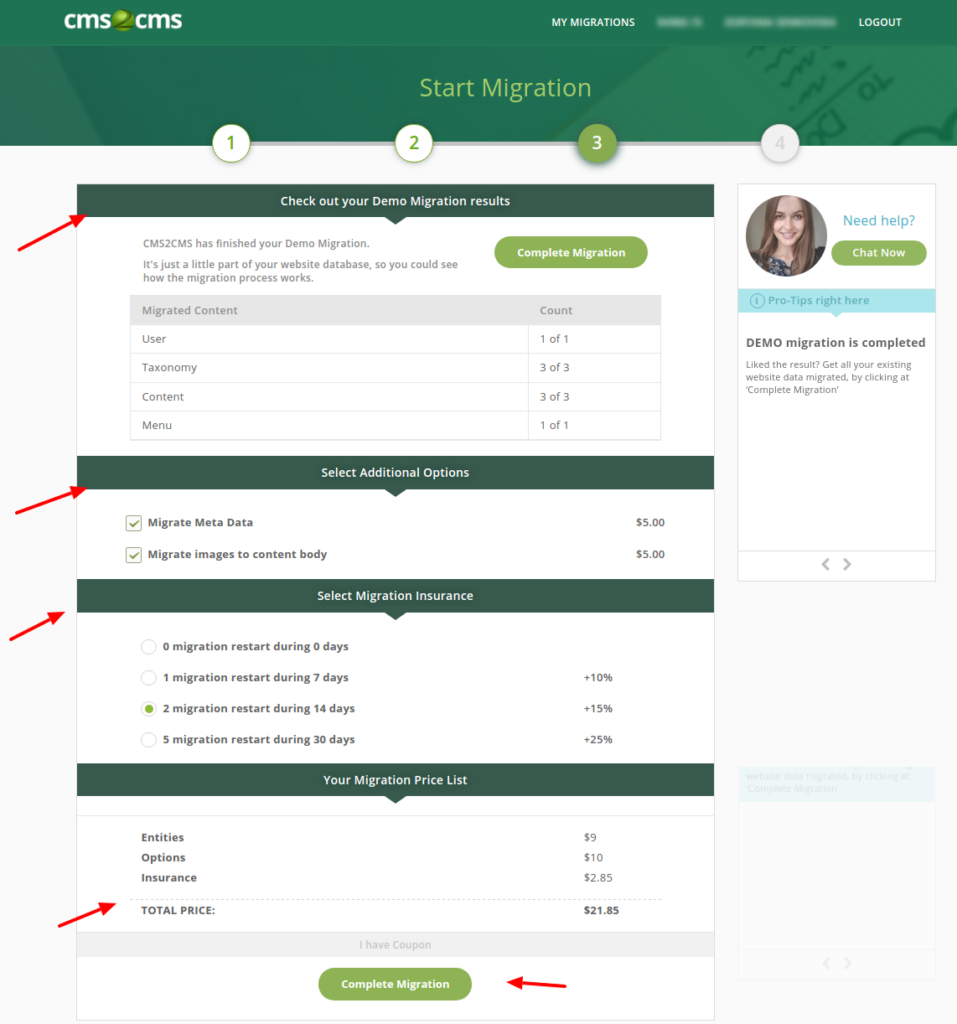
- Select Additional options like Migrate Meta Data or Migrate Images To Content Body (this is optional) and launch Free Demo.
What should I do after Demo migration is completed?
- If you’re satisfied with the Demo migration outcome, by checking the details and how much complete content migration will cost you, click ‘Complete Migration’
Keen on ‘How-to’ videos? Here You Are:
Summing up
See? There’s nothing you can do 🙂 aisite would be glad to know what were the migration results and if the switch went smoothly.


