Extending our series about WordPress properties, this post aims to highlight a list of the very first steps after a fresh install to get a WordPress website set up to your liking. This is the list of essential settings one should follow right after migration to WordPress.
The WordPress 5-minute install is really great – nothing complicated about getting your website up and running in record time. However, after you’ve installed WordPress, there are still a number of things you should take in order before you ever write a word. Use the following as a to-do checklist and you keep yourself right.
1. Remove the default “admin” account
By default WordPress creates “Admin” as a username for your website. In case you continue using it – that’s definitely a security risk. Changing the username is not hard to do. First go to “Users” in your WordPress admin panel and select “Add New”. Create a new user account (it is recommended to add unique and difficult-to-remember words).

2. Trash the default content
WordPress comes with a bit of “sample” content titled “Hello World” in order to show you what a post (and a comment) looks like as soon as it’s published. In order to get rid of it – follow Posts >> All Posts >> (hover over title) Trash.
3. Change the permalink structure
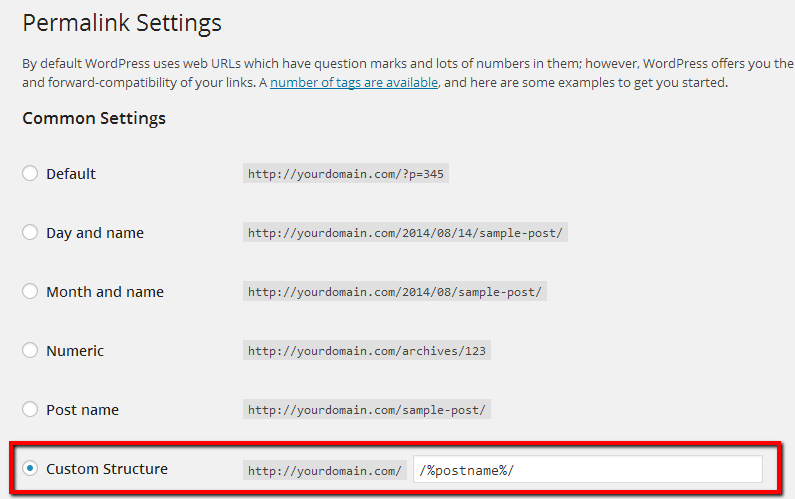
This setting is often treated as the most vital of them. By default, WordPress sets your article URLs to look something like http://yourdomain.com/?p=345. Since there are any readable words in the URL – it is poor for your website SEO. You can change your URL structure to look more like http://yourdomain.com/the-very-first-steps-after-migration-to-wordpress going to Settings ->Permalinks. Now make sure the button beside Custom Structure is checked and enter “Post name” in the field. Once you’ve selected one, click save.

4. Select a theme that suits your style
To change the default WordPress theme, browse or buy a theme that suits your style and activate it. You’ve found from an abundance of free themes available at WordPress.org one that fits you most – follow Appearance >> Themes >> Install Themes tab (default view is “Manage Themes” tab – you will need to select “Install Themes”) >> Activate. Additionally, you can install your own one – to do that use “Upload” button and then browse for the theme file you downloaded. Once you have chosen a theme, remember to “Activate” it.

5. Install Google XML sitemaps
After you have installed WordPress, you might want to be found by Google bots. You may make use of Google XML Sitemaps plugin – it creates an XML Sitemap of your site that is then submitted to the major search engines (Google, Yahoo,etc.) allowing them to index your site easily. Besides, you may go to Google Webmaster Central and log in with your Google Account. Once you’ve done the instructions there – click the “Add Sitemap” link from the first page and put in the URL to your sitemap, which will be http://www.yoursite.com/sitemap.xml.
6. Activate Google Analytics
In case you wish to check out all your site’s statistics – Google Analytics is probably the best way to do that for free. It allows to track your online performance, monitor your traffic and analyze the behavior of your visitors. In order to integrate it on your site – make sure to install it, get an ID code and plug that code in your theme’s header file before it will begin tracking your site.
7. Add categories and set a default
At some point you’re going to post an article and forget to select a category – therefore it will be posted under the default Uncategorized category. In order to change it – go to Posts > Categories. Click on “Uncategorized” button to edit it – change it to “News” or something related to your context.
8. Activate Akismet plugin
Needless to say that comment spam on WordPress tends to be epidemic over the last decades. You can prevent spam comments by activating an Akismet plugin (WordPress comes shipped with it by default) which does a pretty fantastic job of stopping spam. To activate that, you need to enter your WordPress API key to activate it, which you can get from signing up for a WordPress.com account.

9. Install WordPress database backup
Installing a database backup plugin (e.g. BackUpWordPress) makes it easier for you to backup your website’s files. In case you need to transfer it to a new host, or your site got crashed or hacked – this app will come in handy having all the content saved in one place.
10. Install necessary plugins
Being one of the best features of WordPress, plugins allow to extend the core functionality of a website as required. Go to the “Plugins” section, click “Add New” from the menu under Plugins and search for the plugins necessary for your website running successfully. Here’s a comprehensive list of essential WordPress plugins that are recommended for usage.
Hopefully, the aforementioned list of steps will allow you to make your WordPress website up and running in record time.
Thinking of converting your current website to WordPress? Then look no further than aisite migration service that ensure your migration go as straightforward and error-free as possible.


